


Table of Contents
あらかじめ設定した選択肢のリストから項目を選択させる際に使用するUIパーツであるピッカーの使用方法についてです。
Swift でアプリ内にピッカーを作成するには、クラス UIPickerView を使用します。
UIPickerViewのサンプル
次のようなシンプルなピッカーを表示するアプリを作ってみます。

サンプルのソースコード
Xcode でプロジェクトを「Single View Application」のテンプレートで作成します。
自動作成される ViewController.swift を以下のように書き換えてください。
ViewController.swift
import UIKit

class ViewController: UIViewController, UIPickerViewDelegate, UIPickerViewDataSource {

    // 選択肢
    let dataList = ["iOS", "macOS", "tvOS", "Android", "Windows"]

    override func viewDidLoad() {
        super.viewDidLoad()

        // ピッカーの作成
        let picker = UIPickerView(frame: CGRect(x: 0, y: 0, width: self.view.frame.width, height: 100))
        picker.center = self.view.center

        // プロトコルの設定
        picker.delegate = self
        picker.dataSource = self

        // はじめに表示する項目を指定
        picker.selectRow(1, inComponent: 0, animated: true)

        // 画面にピッカーを追加
        self.view.addSubview(picker)
    }

    // UIPickerViewDataSource

    func numberOfComponents(in pickerView: UIPickerView) -> Int {
        // 表示する列数
        return 1
    }

    func pickerView(_ pickerView: UIPickerView, numberOfRowsInComponent component: Int) -> Int {
        // アイテム表示個数を返す
        return dataList.count
    }

    // UIPickerViewDelegate

    func pickerView(_ pickerView: UIPickerView, titleForRow row: Int, forComponent component: Int) -> String? {
        // 表示する文字列を返す
        return dataList[row]
    }

    func pickerView(_ pickerView: UIPickerView, didSelectRow row: Int, inComponent component: Int) {
        // 選択時の処理
        print(dataList[row])
    }
}
ソースコードの解説
プロトコルの設定
UIPickerView を使用する上で重要なことは、プロトコル UIPickerViewDelegate と UIPickerViewDataSource を設定することです。
これらによって、ピッカーの表示や動作の設定を行うことができます。
上記サンプルにある4つのメソッドは、UIPickerView を使用する上で最低限必要なものです。
他にも様々なメソッドが用意されているので、必要に応じて追加します。
プロトコルが持つメソッドの詳細については、公式ドキュメントをご覧ください。
UIPickerViewDelegate – UIKit | Apple Developer Documentation
UIPickerViewDataSource – UIKit | Apple Developer Documentation
初期の表示項目を指定
メソッド selectRow によって、はじめに表示する項目を指定できます。
最初の項目のインデックス番号は 0 ですので、2番目の項目を最初に表示したい場合は、次のように第一引数に 1 を指定します。
picker.selectRow(1, inComponent: 0, animated: true)
第二引数は、複数のピッカーがアプリ内に表示されていた場合、どのピッカーの初期値を設定しているかを明確にするためのものです。
ピッカーが一つしかない場合は 0 を指定してください。
選択肢の設定
「表示する選択肢の数」「表示する項目のラベル」「選択された時の動作」などの設定は、全て別々のメソッドで行います。
したがって、選択肢のデータは、これらのメソッドからアクセスしやすい形で書きます。
例えば、サンプルのように、クラスのプロパティとして配列として選択肢を保持する方法が考えられます。
// 選択肢
let dataList = ["iOS", "macOS", "tvOS", "Android", "Windows"]
ピッカーの「表示する選択肢の数」は、この配列の要素数と一致させたいので、メソッド pickerView:numberOfRowsInComponent は以下のように指定します。
    func pickerView(_ pickerView: UIPickerView, numberOfRowsInComponent component: Int) -> Int {
        // アイテム表示個数を返す
        return dataList.count
    }
「表示する項目のラベル」は、配列の要素をそのまま表示したいので、メソッド pickerView:titleForRow:forComponent 以下のように書きます。
    func pickerView(_ pickerView: UIPickerView, titleForRow row: Int, forComponent component: Int) -> String? {
        // 表示する文字列を返す
        return dataList[row]
    }
変数 row には、インデックス番号が保持されています。
「選択された時の動作」は、以下のメソッド内に書きます。サンプルでは、ログに選択された項目を表示しています。
    func pickerView(_ pickerView: UIPickerView, didSelectRow row: Int, inComponent component: Int) {
        // 選択時の処理
        print(dataList[row])
    }
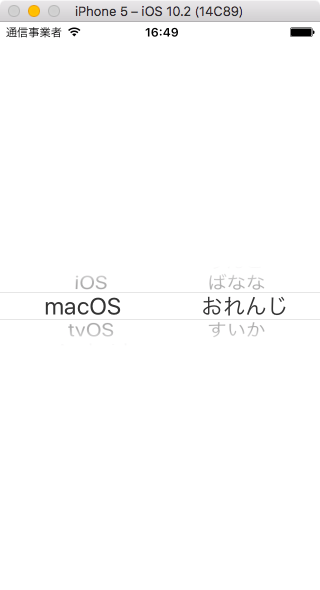
複数のピッカーを表示するサンプル
アプリのひとつの画面に複数のピッカーを表示して、別々の選択肢を表示する例です。
UIPickerViewDelegate と UIPickerViewDataSource のメソッドの引数にある component には、ピッカーのインデックス番号が保持されています。
これによって条件分岐を行うと、複数のピッカーを区別して様々な設定が可能になります。
import UIKit

class ViewController: UIViewController, UIPickerViewDelegate, UIPickerViewDataSource {

    // 選択肢
    let dataList = ["iOS", "macOS", "tvOS", "Android", "Windows"]
    let dataList2 = ["りんご", "ばなな", "おれんじ", "すいか"]

    override func viewDidLoad() {
        super.viewDidLoad()

        // ピッカーの作成
        let picker = UIPickerView(frame: CGRect(x: 0, y: 0, width: self.view.frame.width, height: 100))
        picker.center = self.view.center

        // プロトコルの設定
        picker.delegate = self
        picker.dataSource = self

        // はじめに表示する項目を指定
        picker.selectRow(1, inComponent: 0, animated: true)
        picker.selectRow(2, inComponent: 1, animated: true)

        self.view.addSubview(picker)
    }


    // UIPickerViewDataSource


    func numberOfComponents(in pickerView: UIPickerView) -> Int {
        // 表示する列数
        return 2
    }

    func pickerView(_ pickerView: UIPickerView, numberOfRowsInComponent component: Int) -> Int {
        // アイテム表示個数を返す

        if component == 0 {
            // 1個目のピッカーの設定
            return dataList.count
        }

        return dataList2.count
    }


    // UIPickerViewDelegate

    func pickerView(_ pickerView: UIPickerView, titleForRow row: Int, forComponent component: Int) -> String? {
        // 表示する文字列を返す

        if component == 0 {
            // 1個目のピッカーの設定
            return dataList[row]
        }

        return dataList2[row]
    }

    func pickerView(_ pickerView: UIPickerView, didSelectRow row: Int, inComponent component: Int) {
        // 選択時の処理

        if component == 0 {
            // 1個目のピッカーの設定
            print(dataList[row])
        }
        print(dataList2[row])
    }
}
実行結果は以下のようになります。
以上、基本的なUIPickerViewの使用方法でした。さらに詳しい設定はドキュメントをご覧ください。