


Table of Contents
iCloud の iCloud Documents の機能を使って、テキストファイルを iCloud Container に保存して、そのファイルに対して書き込みや読み込みを行う方法です。
iOSアプリで iCloud にアクセスするための事前準備に関しては以下の記事をご覧ください。
iCloud Document や CloudKit を使用するためのコンテナの作成と設定
サンプルソースコード
iCloud Container にテキストファイルを作成して書き込みや読み込みを行うサンプルプログラムです。
ViewController.swift
import UIKit

class ViewController: UIViewController, UITextFieldDelegate {

    let textField = UITextField()
    let textFileName = "test.txt"

    override func viewDidLoad() {
        super.viewDidLoad()

        self.view.backgroundColor = UIColor(white: 1, alpha: 0.9)

        // 保存するテキストを入力するテキストフィールド
        textField.backgroundColor = UIColor.white
        textField.frame = CGRect(x: 0, y: 100, width: self.view.frame.width, height: 50)
        textField.center.x = self.view.center.x
        textField.delegate = self
        textField.placeholder = "Input"
        self.view.addSubview(textField)

        // テキストファイルを作成して書き込む
        let button = UIButton(type: .system)
        button.setTitle("書き込み", for: .normal)
        button.addTarget(self, action: #selector(self.writeTextToiCloudContainer), for: .touchUpInside)
        button.sizeToFit()
        button.center = CGPoint(x: self.view.frame.width / 2, y: self.view.frame.height - 150)
        self.view.addSubview(button)

        // 保存したテキストを読み込む
        let readButton = UIButton(type: .system)
        readButton.setTitle("読み込み", for: .normal)
        readButton.addTarget(self, action: #selector(self.readTextFromiCloudContainer), for: .touchUpInside)
        readButton.sizeToFit()
        readButton.center = CGPoint(x: self.view.frame.width / 2, y: self.view.frame.height - 100)
        self.view.addSubview(readButton)
    }

    func writeTextToiCloudContainer() {

        // 特定の iCloud Container を指定する場合
        // let url = FileManager.default.url(forUbiquityContainerIdentifier: "iCloud.com.joyplot")

        DispatchQueue.global().async(execute: {

            // コンテナが一つしかない場合は nil でもOK
            if let url = FileManager.default.url(forUbiquityContainerIdentifier: nil) {

                let fileURL = url.appendingPathComponent(self.textFileName)
                print("fileURL: \(fileURL)")


                do {
                    try self.textField.text?.write(to: fileURL, atomically: true, encoding: .utf8)
                } catch {
                    print("write error")
                }
            }
        })
    }

    func readTextFromiCloudContainer() {

        DispatchQueue.global().async(execute: {

            if let url = FileManager.default.url(forUbiquityContainerIdentifier: nil) {

                let filePath = url.appendingPathComponent(self.textFileName)
                do {
                    let readText = try String(contentsOf: filePath)

                    DispatchQueue.main.async(execute: {
                        // UILabelのテキストを更新
                        let label = UILabel()
                        label.text = readText
                        label.font = UIFont(name: "HiraMinProN-W3", size: 20)
                        label.sizeToFit()
                        label.center = self.view.center
                        self.view.addSubview(label)
                    })
                } catch {
                    print("read error")
                }
            }
        })
    }

    func textFieldShouldReturn(_ textField: UITextField) -> Bool {
        textField.resignFirstResponder()
        return true
    }

    override func didReceiveMemoryWarning() {
        super.didReceiveMemoryWarning()
    }
}
サンプルコードの解説
メソッド writeTextToiCloudContainer でテキストファイルの作成および書き込み、メソッド readTextFromiCloudContainer で保存したテキストファイルの中身を読み込んで UILabel で画面に表示します。
これらのメソッドで初めに行っているのは、保存先となる iCloud Container のファイルURLを取得することです。
iCloud Container のURLを取得
iCloud Container のファイルURLを取得するには、クラス FileManager のメソッド url(forUbiquityContainerIdentifier:) を使用します。
FileManager.default.url(forUbiquityContainerIdentifier: "コンテナ名")
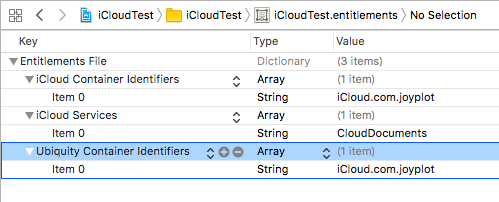
引数にコンテナ名(Identifier)を指定すると、特定のコンテナのファイルURLを取得できます。nil を指定した場合は、iCloud を有効にした際に自動作成される .entitlements に記載された Ubiquity Container Identifiers の中の一番最初の値のコンテナが選択されます。
The container identifiers for your app must be declared in the com.apple.developer.ubiquity-container-identifiers array of the .entitlements property list file in your Xcode project.
If you specify nil for this parameter, this method returns the first container listed in the com.apple.developer.ubiquity-container-identifiers entitlement array.
url(forUbiquityContainerIdentifier:) – FileManager | Apple Developer Documentation
例えば .entitlements の中身が以下のようになっていた場合、nil を指定すれば iCloud.com.joyplot というコンテナが自動選択されます。
もし iCloud に接続できず、有意なURLを取得できない場合、メソッド url は nil を返すため、nil の場合はそれ以降の処理を実行させないようにしています。
また、このメソッドはmainスレッド以外での実行が推奨されています。その理由は、iCloud上のURLを取得するとき、場合によってはかなり長い時間がかかることがあり、その間他の処理が止まってしまうからです。
ドキュメントには以下のように記載されています。
Do not call this method from your app’s main thread. Because this method might take a nontrivial amount of time to set up iCloud and return the requested URL, you should always call it from a secondary thread.
URLForUbiquityContainerIdentifier: – NSFileManager | Apple Developer Documentation
別スレッドを用意するには GCD の DispatchQueue を使います。
サンプルのように全体を DispatchQueue.global() で囲み、UIの更新に関わる部分のみをmainスレッドで行うようにします。
DispatchQueue.global().async(execute: {
    // 時間のかかる処理

    DispatchQueue.main.async(execute: {
        // UI更新など
    })
})
iCloud上のファイルへの書き込み・読み込み
iCloud Container のURLが取得できたら、あとはローカルファイルと全く同じように書き込みや読み込みを行うことができます。
実行結果
まず、アプリがiCloudへアクセスする権限があることを確認しておいてください。
アプリを起動して、テキストフィールドに適当な文字列を入力します。
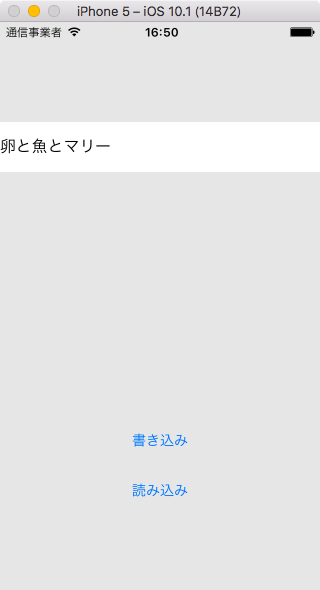
書き込みボタンを押すと、ログに iCloud Container に保存されたファイルのファイルURLがログに表示されます。
![]()
次に、読み込みボタンを押すと、書き込んだテキストが UILabel として画面中央に表示されます。

アプリを再起動して読み込みボタンを押すと、iCloudに書き込んだテキストが読み込まれることが確認できると思います。
以上で iCloud にテキストファイルを保存して、書き込みと読み込みができました。