


Table of Contents
Cocos2d-x(javascriptで動くCocos2d-js)と物理エンジン Chipmunk を使って重力に引かれるスプライトを作る簡単なプログラムを作ってみます。
サンプルの実行環境
今回のサンプルを動作させた環境は以下の通りです。
- OS: Mac OS X El Capitan
- Cocos バージョン: Cocos2d-x v3.11.1
- ブラウザ: Google Chrome
プロジェクトの作成と準備
Cocos2d-xの導入が済んでいるとして説明します。
新規プロジェクトを作成
適当なディレクトリに新しいプロジェクトを作成してください。
以下のコマンドで、カレントディレクトに新しいプロジェクト(MyJSGame)を作成できます。
cocos new -l js
project.json に Chipmunk を追加
Chipmunk を使うために、作成したプロジェクト内にある project.json の一部を書き換えます。
初期状態の project.json は以下のようになっていると思います。
{
  "project_type": "javascript",
  "debugMode" : 1,
  "showFPS" : true,
  "frameRate" : 60,
  "noCache" : false,
  "id" : "gameCanvas",
  "renderMode" : 0,
  "engineDir":"frameworks/cocos2d-html5",
  "modules" : ["cocos2d"],
  "jsList" : [
    "src/resource.js",
    "src/app.js"
  ]
}
modules の値に「chipmunk」を追加します。以下のように書き加えてください。
{
  ...(略)...
  "modules" : ["cocos2d", "chipmunk"],
  ...(略)...
}
app.js を編集
app.js の中身を以下のように書き換えてください。
各部分のコードの解説は後ほど行います。とりあえず動かしてみましょう。
var HelloWorldLayer = cc.Layer.extend({
    space: null,
    ctor: function() {

        this._super();

        this.initSpace();
        this.createPhysicsSprite();
        this.createFloor();
    },
    initSpace: function() {

        this.space = new cp.Space();

        // 重力加速度
        this.space.gravity = cp.v(0, -980);

        // shapeを可視化する(デバッグ用)
        this.addChild(new cc.PhysicsDebugNode(this.space));

        this.scheduleUpdate();
    },
    createPhysicsSprite: function() {

        // 物理スプライト
        var physicsSprite = new cc.PhysicsSprite("res/HelloWorld.png");

        // 質量
        var mass = 100;

        // スプライトの大きさを取得
        var width = physicsSprite.getContentSize().width;
        var height = physicsSprite.getContentSize().height;

        // 質量、慣性モーメントを設定
        var body = new cp.Body(mass, cp.momentForBox(mass, width, height));
        this.space.addBody(body);

        // 形状、摩擦係数、反発係数を設定
        var shape = new cp.BoxShape(body, width, height);
        shape.setFriction(0.2);
        shape.setElasticity(0.8);
        this.space.addShape(shape);
        physicsSprite.setBody(body);
        physicsSprite.setPosition(cc.winSize.width / 2, cc.winSize.height);
        this.addChild(physicsSprite);
    },
    createFloor: function() {

        // 床を静的剛体として作る
        var floorThickness = 10;
        var startPos = cp.v(0, 100);
        var endPos = cp.v(cc.winSize.width, 100);
        var floor = new cp.SegmentShape(this.space.staticBody, startPos, endPos, floorThickness);
        floor.setFriction(0.2);
        floor.setElasticity(1);
        this.space.addShape(floor);
    },
    update: function(dt) {
        // 物理エンジンの更新
        this.space.step(dt);
    },
});
var HelloWorldScene = cc.Scene.extend({
    onEnter: function() {

        this._super();
        var layer = new HelloWorldLayer();
        this.addChild(layer);
    }
});
サンプルの実行結果
以下のコマンドをターミナルに入力して、プログラムをブラウザで実行してみましょう。
cocos run -p web
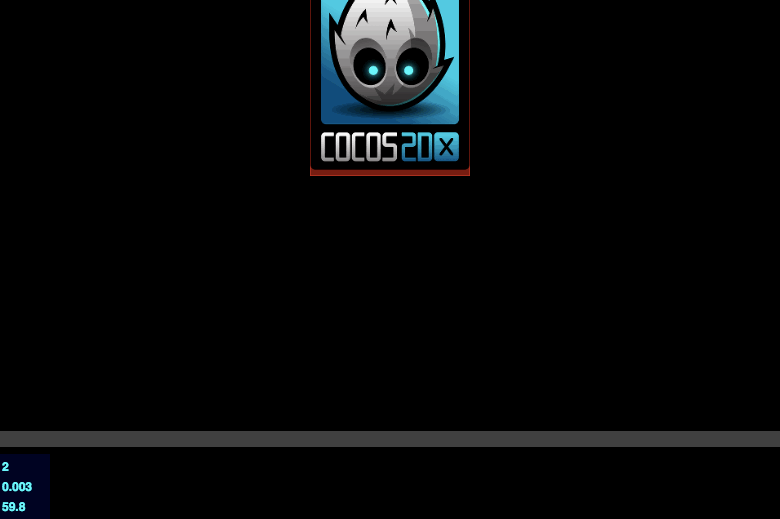
ブラウザが起動し、床で跳ねるCocosのロゴが現れると思います。
サンプルソースコードの解説
initSpaceメソッド
ここでは、物理エンジンの初期設定を行っています。
物理シミュレート空間を作る
Chipmunkでは、Space という物理挙動を行うオブジェクトを管理するためのコンテナがあり、そこに物体を登録していきます。
Spaces: Spaces are containers for simulating objects in Chipmunk. You add bodies, shapes and joints to a space and then update the space as a whole. They control how all the rigid bodies, shapes, and constraints interact together.
Chipmunk Game Dynamics Manual
Spaces: SpacesはChipmunkにおける物体をシミュレートするコンテナです。body(剛体)やshape(形状)、joint(接続)などを space に追加し、それら全体を更新します。スペースはすべての剛体や形状、制約(2つの物体を固定するなど)に働く作用をコントロールします。
物理挙動をシミュレートするには、この space を初めに作る必要があります。
this.space = new cp.Space();
spaceは他のメソッドからもアクセスするので、関数のローカル変数ではなく、HelloWorldLayerクラスのフィールドとして設定しておきます。
重力加速度を設定
space作成後、そのspaceに登録した物体に働く重力を設定します。重力は space.gravity です。
this.space.gravity = cp.v(0, -980);
Chipmunkにおいて、ベクトルは以下のように表現します。
cp.v(水平方向, 垂直方向)
shapeの可視化
物体の形状(shape)に赤い半透明な色をつけます。これがないと、スプライトを設定していない shape は全く見えなくなります。
this.addChild(new cc.PhysicsDebugNode(this.space));
物理エンジンの更新
毎フレームupdateメソッドを呼び出して物体を更新します。
this.scheduleUpdate();
createPhysicsSpriteメソッド
物理挙動をするスプライト(Cocosのロゴ)を作ります。
bodyの作成
body を作成し、spaceに追加します。body とは剛体(rigid body)のことで、設定しない限りは形を持ちません。
Rigid Bodies: A rigid body holds the physical properties of an object. (mass, position, rotation, velocity, etc.) It does not have a shape until you attach one or more collision shapes to it.
Chipmunk Game Dynamics Manual
Rigid Bodies: 剛体はオブジェクトの物理的な特性(質量、位置、回転、速度など)を持ちます。形状(衝突する形)を一つ以上設定しない限りは形を持ちません。
このサンプルでは、最も基本的な「質量」と「慣性モーメント」のみを設定します。
var body = new cp.Body(mass, cp.momentForBox(mass, width, height));
this.space.addBody(body);
new cp.Body で body を作ります。引数は以下のようになっています。
new cp.Body(質量, 慣性モーメント)
四角形の慣性モーメントは以下のように設定します。
cp.momentForBox(質量, 幅, 高さ)
円であれば momentForCircle、線であれば momentForSegment になります。
shapeの作成
shapeを作成し、spaceに追加します。
Collision Shapes: By attaching shapes to bodies, you can define the a body’s shape. You can attach as many shapes to a single body as you need to in order to define a complex shape. Shapes contain the surface properties of an object such as how much friction or elasticity it has.
Chipmunk Game Dynamics Manual
Collision Shapes: body(剛体)に形状を設定することで、bodyの形を定義できます。
必要な数だけ一つのbodyに形状を結びつけることができ、複雑な形を表現できます。形状は表面に摩擦や反発がどれくらい働くのかといった値を保有しています。
プログラム内で実際に設定しているのは、以下の部分です。
var shape = new cp.BoxShape(body, width, height);
shape.setFriction(0.2);
shape.setElasticity(0.8);
this.space.addShape(shape);
new cp.BoxShape で四角形を作ります。第一引数に先ほど作成した body を渡します。これで body に設定した質量と慣性モーメントを持つ四角形ができます。
引数は以下の通りです。
cp.BoxShape(body, 幅, 高さ)
摩擦の設定には setFriction、反発係数の設定には setElasticity の引数に 0 〜 1 の小数値を渡します。
setFriction を 0 にすると、摩擦力が全く働かなくなります。
setElasticity を 0 にすると反発が起きず、逆に 1 にすると完全反射となります。
PhysicsSpriteの作成
物理挙動をするスプライトを作成します。cc.Sprite ではなく cc.PhysicsSprite であることに注意です。
var physicsSprite = new cc.PhysicsSprite("res/HelloWorld.png");
...
physicsSprite.setBody(body);
physicsSprite.setPosition(cc.winSize.width / 2, cc.winSize.height);
this.addChild(physicsSprite);
基本的には普通のスプライトと同じメソッドが使えます。
PhysicsSprite のメソッド setBody の引数として先ほど作成した body を渡すと、物理的な性質を示すスプライトが作れます。
createFloorメソッド
床を作成しています。
var floorThickness = 10;
var startPos = cp.v(0, 100);
var endPos = cp.v(cc.winSize.width, 100);
var floor = new cp.SegmentShape(this.space.staticBody, startPos, endPos, floorThickness);
floor.setFriction(0.2);
floor.setElasticity(1);
this.space.addShape(floor);
スプライトの shape を作成した時と違うのは、
- cp.BoxShape が cp.SegmentShape に変わっている
- body を作成せず、cp.SegmentShape の第一引数に this.space.staticBody を渡している
という点です。
shapeの作成
床は四角形ではなく、線として形状を作成しているので、cp.SegmentShape を使っています。
cp.SegmentShape の引数は以下のようです。
new cp.SegmentShape(body, 開始位置, 終了位置, 線の太さ);
開始位置および終了位置はベクトルで表します。
body を this.space.staticBody とすれば、重力や衝突による影響を受けない静止物体(static body)が作れます。
今回 body を作成していないのはそのためです。
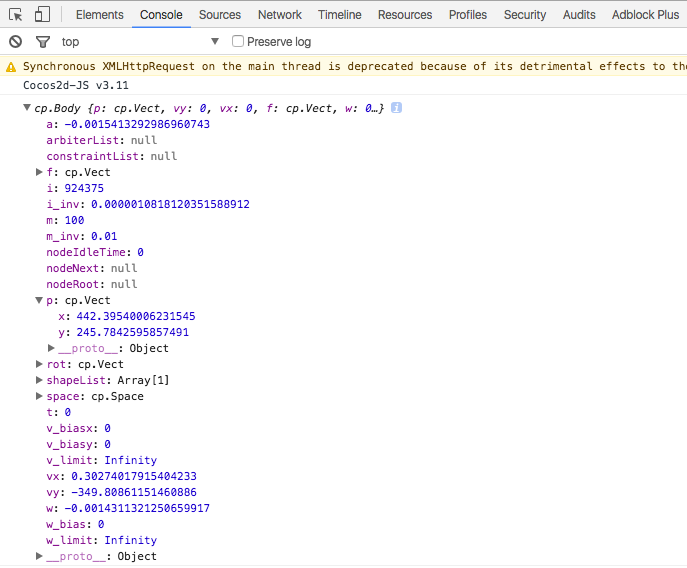
プロパティを調べる
Google Chrome でテストする場合、デベロッパーツールのコンソールで body や shape のプロパティを確認したり、その場で値を変えてテストをしたりできます。
cc.log(body);
以下は body のプロパティを表示した例です。
以上で簡単な物理挙動が作れました。
Chipmunkで物体を作る基本の流れは、以下のようになります。
- bodyを作成してspaceに追加
- shapeを作成し、bodyを関連付け、spaceに追加
- PhysicsSpriteを作成し、bodyを関連付ける
- 物体の移動や回転、衝突時の処理などはそのうちまとめられたらと思います。
Chipmunkのマニュアル
より複雑な物理処理については公式のマニュアルをご覧ください。