


Table of Contents
入力した履歴が一覧表示される UITextField を作る方法を解説します。
動作サンプル
このように入力したテキストの履歴が記録されて表示されます。
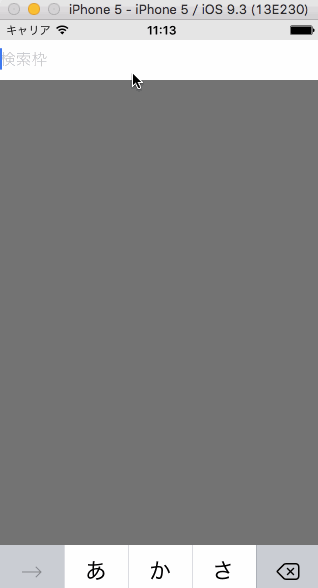
削除や履歴からの入力もできます。
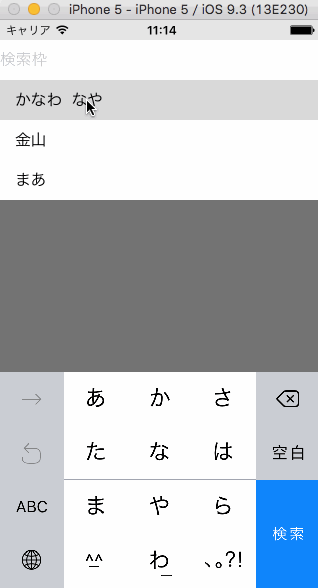
今回紹介するプログラムでできることは、上でご覧いただいた3つです。
- テキストフィールドに入力した文字列の履歴を表示させる
- 履歴をタップしてテキストフィールドに入力させる
- 履歴を削除する
履歴を記憶するために UserDefaults を使い、履歴の一覧表示には UITableView を使用します。
ソースコード
細かい部分の解説の前に、全ソースコードを記載します。
新規作成したプロジェクトにコピペすると実際に動作確認ができます。
import UIKit

class ViewController: UIViewController, UITextFieldDelegate, UITableViewDelegate, UITableViewDataSource {

    let userDefaults = UserDefaults.standard

    var textField: UITextField!
    var tableView: UITableView!
    let statusBarHeight = UIApplication.shared.statusBarFrame.height
    var textFieldHeight: CGFloat = 40

    override func viewDidLoad() {
        super.viewDidLoad()

        self.view.backgroundColor = UIColor(white: 0.9, alpha: 1)

        // 検索窓
        textField = UITextField(frame: CGRect(x: 0, y: statusBarHeight, width: self.view.frame.width, height: textFieldHeight))
        textField.delegate = self
        textField.placeholder = "検索枠"
        textField.backgroundColor = UIColor.white
        textField.returnKeyType = .search //キーボードの「改行」を「検索」にする
        self.view.addSubview(textField)
    }

    // 新しく履歴に追加
    func addHistory(text: String) {

        if text == "" {
            return
        }

        var histories = getInputHistory()

        for word in histories {
            if word == text {
                // すでに履歴にある場合は追加しない
                return
            }
        }

        histories.insert(text, at: 0)
        userDefaults.set(histories, forKey: "inputHistory")
    }

    // 履歴を一つ削除
    func removeHistory(index: Int) {
        var histories = getInputHistory()
        histories.remove(at: index)
        userDefaults.set(histories, forKey: "inputHistory")
    }

    // 履歴取得
    func getInputHistory() -> [String] {
        if let histories = userDefaults.array(forKey: "inputHistory") as? [String] {
            return histories
        }
        return []
    }

    // UITableViewCellから履歴を入力
    func inputFromHistory(sender: UITapGestureRecognizer) {
        if let cell = sender.view as? UITableViewCell {
            textField.text = cell.textLabel?.text
        }
    }

    // MARK: - UITextFieldDelegate関連

    func textFieldShouldReturn(_ textField: UITextField) -> Bool {
        textField.resignFirstResponder()
        tableView.removeFromSuperview()

        addHistory(text: textField.text!)

        textField.text = ""

        return true
    }

    func textFieldShouldBeginEditing(_ textField: UITextField) -> Bool {

        let topMargin = statusBarHeight + textFieldHeight

        tableView = UITableView(frame: CGRect(x: 0, y: topMargin, width: self.view.frame.width, height: self.view.frame.height - topMargin))
        tableView.delegate = self
        tableView.dataSource = self
        tableView.backgroundColor = UIColor(white: 0, alpha: 0.5)
        tableView.allowsSelection = false
        self.view.addSubview(tableView)

        return true
    }

    // MARK: - UITableView関連

    func tableView(_ tableView: UITableView, numberOfRowsInSection section: Int) -> Int {
        // テーブルセルの数を設定(必須)
        return getInputHistory().count
    }

    func tableView(_ tableView: UITableView, cellForRowAt indexPath: IndexPath) -> UITableViewCell {
        // テーブルセルを作成(必須)

        let cell = UITableViewCell(style: .default, reuseIdentifier: "Cell")
        cell.textLabel?.text = getInputHistory()[indexPath.row]
        cell.addGestureRecognizer(UITapGestureRecognizer(target: self, action: #selector(self.inputFromHistory(sender:))))

        return cell
    }

    func tableView(_ tableView: UITableView, heightForRowAt indexPath: IndexPath) -> CGFloat {
        // テーブルセルの高さを設定
        return textFieldHeight
    }

    func tableView(_ tableView: UITableView, titleForDeleteConfirmationButtonForRowAt indexPath: IndexPath) -> String? {
        // 左スワイプして出てくる削除ボタンのテキスト
        return "削除"
    }

    private func tableView(tableView: UITableView, commitEditingStyle editingStyle: UITableViewCellEditingStyle, forRowAtIndexPath indexPath: NSIndexPath) {
        // 左スワイプして出てくる削除ボタンを押した時の処理

        removeHistory(index: indexPath.row)

        tableView.deleteRows(at: [indexPath as IndexPath], with: .fade)
    }

    func tableView(_ tableView: UITableView, canEditRowAt indexPath: IndexPath) -> Bool {
        // すべてのセルを削除可能に
        return true
    }
}
処理の流れ
テキストフィールドに文字列を入力して「検索」ボタンを押すと、UITextFieldDelegate のメソッド textFieldShouldReturn が呼ばれます。なので、このメソッド内で入力されたテキストを保存します。これを行うのが addHistory というメソッドです。
入力を履歴の保存
    // 新しく履歴に追加
    func addHistory(text: String) {

        if text == "" {
            return
        }

        var histories = getInputHistory()

        for word in histories {
            if word == text {
                // すでに履歴にある場合は追加しない
                return
            }
        }

        histories.insert(text, at: 0)
        userDefaults.set(histories, forKey: "inputHistory")
    }
まず getInputHistory ですでに保存されている履歴を取得し、配列 histories に格納します。もし入力された文字列が履歴にある場合や入力が空であるときは return で処理を中断します。
まだ履歴になかったら、配列の先頭に加えて NSUserDefaults に保存してある履歴を上書きします。ここで、append ではなく insert を使って配列の先頭に新しい履歴を追加することに注意です。
append で要素を追加してしまうと、履歴の一覧を表示したとき、古いものの方が上に来てしまいます。
履歴を呼び出す
テキストフィールドを選択した時に履歴一覧を表示させます。テキストフィールドにフォーカスを当てると textFieldShouldBeginEditing が呼ばれますので、ここで UITableView を使って一覧を作っています。
UITableView の設定は UITableViewDelegate と UITableViewDataSource のメソッドを呼び出す形で行います。
実際に履歴を表示させている部分は tableView:cellForRowAt indexPath: です。
    func tableView(_ tableView: UITableView, cellForRowAt indexPath: IndexPath) -> UITableViewCell {
        // テーブルセルを作成(必須)

        let cell = UITableViewCell(style: .default, reuseIdentifier: "Cell")
        cell.textLabel?.text = getInputHistory()[indexPath.row]
        cell.addGestureRecognizer(UITapGestureRecognizer(target: self, action: #selector(self.inputFromHistory(sender:))))

        return cell
    }
テーブルセルのテキストを履歴から読み込み、そのセルをタップがタップに反応するようにタップジェスチャーを追加します。
履歴からテキストを入力する
タップジェスチャーが設定されたテーブルセルをタップすると、メソッド inputFromHistory が呼び出され、テーブルセルに設定された文字列がテキストフィールドに入力されます。
    // UITableViewCellから履歴を入力
    func inputFromHistory(sender: UITapGestureRecognizer) {
        if let cell = sender.view as? UITableViewCell {
            textField.text = cell.textLabel?.text
        }
    }
履歴を削除する
削除に必要なのは以下のメソッド3つです。
テーブルセルを左にスワイプしたときに削除ボタンが表示されるようにするには、UITableViewDataSource のメソッド tableView:commitEditingStyle:forRowAtIndexPath: を定義します。
そして、すべてのテーブルセルを削除可能なように tableView:canEditRowAt indexPath: で true を返します。
    private func tableView(tableView: UITableView, commitEditingStyle editingStyle: UITableViewCellEditingStyle, forRowAtIndexPath indexPath: NSIndexPath) {
        // 左スワイプして出てくる削除ボタンを押した時の処理

        removeHistory(index: indexPath.row)

        tableView.deleteRows(at: [indexPath as IndexPath], with: .fade)
    }

    func tableView(_ tableView: UITableView, canEditRowAt indexPath: IndexPath) -> Bool {
        // すべてのセルを削除可能に
        return true
    }
removeHistory は保存された履歴の一つを、配列のインデックスを指定して削除するメソッドです。これで NSUserDefaults から履歴が取り除かれます。
    // 履歴を一つ削除
    func removeHistory(index: Int) {
        var histories = getInputHistory()
        histories.remove(at: index)
        userDefaults.set(histories, forKey: "inputHistory")
    }
ピンバック: Cocos2d-x(js)のccui.ListViewでリストメニューを作る | JoyPlotドキュメント