ブラウザ上で様々な3Dモデルをアニメーション付きでレンダリングできる JavaScript のライブラリである three.js を使ってみました。
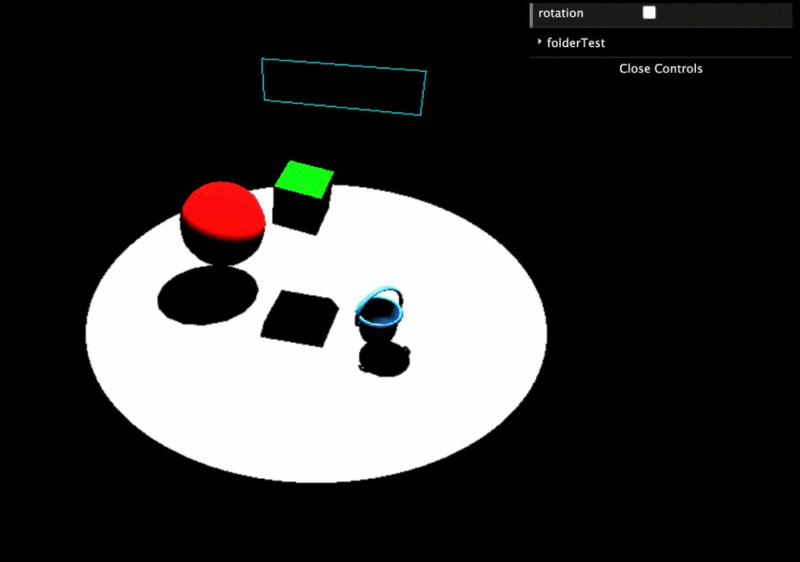
three.js を使うと、以下のような3Dモデルを含むシーンをWebページ内に簡単に埋め込み表示することができます。
実際に操作可能な埋め込み例はページ下部に表示しています。
下記公式ページには多様なアニメーションサンプルがあります。
Three.js – JavaScript 3D library
サンプルコードと埋め込み例
three.js で基本的な立体や読み込んだ3Dモデルを表示するサンプルです。three.js はライブラリをダウンロードしなくても CDN によって利用することができます。
表示は WebGL を利用しているため、読み込む3Dモデルは glTF 形式であることが推奨されています。
デフォルトでは、影が描画されない設定になっているものが多いので、各3Dモデルで影を発生させるための設定を追加しています。
scene.html
<!DOCTYPE html>
<html>
	<head>
		<meta charset="utf-8">
		<title>Scene</title>
		<style>
			body { margin: 0; }
		</style>
	</head>
	<body>

		<!-- ローカルに用意したファイルを使用する場合 -->
		<!-- <script src="js/three.js"></script> -->

		<!-- CDNを使用する場合 -->
		<script type="module">

			import * as THREE from 'https://unpkg.com/three@0.126.0/build/three.module.js';

			const scene = new THREE.Scene();
			const renderer = new THREE.WebGLRenderer();
			// 影に必要
			renderer.shadowMap.enabled = true;
			renderer.setSize(window.innerWidth, window.innerHeight);
			document.body.appendChild(renderer.domElement);


			// 立方体
			const cube = new THREE.Mesh(
				new THREE.BoxGeometry(),
				new THREE.MeshStandardMaterial( { color: 0x00ff00 } ));
			cube.castShadow = true;
			cube.position.set(0, 3, 1);
			scene.add(cube);


			// 球体
			const sphereGeometry = new THREE.SphereGeometry(1, 16, 16);
			const sphereMaterial = new THREE.MeshStandardMaterial( { color: 0xff0000 } );
			const sphere = new THREE.Mesh(sphereGeometry, sphereMaterial);
			sphere.castShadow = true; // 影を生じる
			sphere.receiveShadow = true; // 影を受ける
			// MeshBasicMaterial では影を受け取れないので注意
			sphere.position.set(-2, 2, 1);
			scene.add(sphere);


			// 線
			const lineMaterial = new THREE.LineBasicMaterial( { color: 0x00ffff } );
			const points = [];
			points.push(new THREE.Vector3(-2, 4, -2));
			points.push(new THREE.Vector3(-2, 5, -2));
			points.push(new THREE.Vector3(2, 5, -2));
			points.push(new THREE.Vector3(2, 4, -2));
			points.push(new THREE.Vector3(-2, 4, -2));
			const lineGeometry = new THREE.BufferGeometry().setFromPoints(points);
			const line = new THREE.Line(lineGeometry, lineMaterial);
			scene.add(line);


			// 3Dモデルのロード
			import { GLTFLoader } from 'https://unpkg.com/three@0.126.0/examples/jsm/loaders/GLTFLoader.js';
			const loader = new GLTFLoader();
			loader.load('Bucket.glb', function(gltf) {
				gltf.scene.traverse(function(model) {
          			if (model.isMesh) {
						// 含まれる全てのメッシュに対して行う処理
            			model.castShadow = true;
            			model.rotation.y = THREE.MathUtils.degToRad(45);
						model.position.set(2, 1, 2);
          			}
        		});

				scene.add(gltf.scene);
			}, function (xhr) {
				// モデル読み込みの進捗をログに出力
				console.log((xhr.loaded / xhr.total * 100) + '% loaded');
			}, function (error) {
				console.error(error);
			});


			// 床となる平面
			const plane = new THREE.Mesh(new THREE.PlaneGeometry(20, 20), new THREE.MeshStandardMaterial());
			// 回転は度ではなくラジアンなので注意
			plane.rotation.x = THREE.MathUtils.degToRad(-90);
			plane.receiveShadow = true;
			scene.add(plane);


			// ターゲットダイレクトライト
			const light = new THREE.DirectionalLight(0xFFFFFF, 5);
			light.position.set(5, 10, 3);
			light.castShadow = true;
			// デフォルトでは非表示に
			light.visible = false;
			scene.add(light);


			// スポットライト
			const spotLight = new THREE.SpotLight(0xffffff, 5, 0, Math.PI / 6);
			spotLight.position.set(0, 10, 0);

			// 影の設定
			spotLight.castShadow = true;
			spotLight.shadow.mapSize.width = 1024;
			spotLight.shadow.mapSize.height = 1024;
			spotLight.shadow.camera.near = 0.5; // default
			spotLight.shadow.camera.far = 500; // default
			spotLight.shadow.focus = 1; // default
			scene.add(spotLight);


			// メニューGUI表示
			import { GUI } from 'https://unpkg.com/three@0.126.0/examples/jsm/libs/dat.gui.module.js';
			const gui = new GUI();

			// ライトの表示を切り替える関数
			let lightChange = function(visibility) {
				console.log(visibility);
				spotLight.visible = !visibility;
				light.visible = visibility;
			}

			// 設定項目
			const settings = {
				rotation: false,
				lightChange: false
			};

			// UIに要素を追加
			gui.add(settings, 'rotation');
			// 折り畳める項目
			const folder = gui.addFolder('folderTest');
			folder.add(settings, 'lightChange').onChange(lightChange);
			gui.open();


			// カメラ設定
			const camera = new THREE.PerspectiveCamera(60, window.innerWidth / window.innerHeight, 0.1, 1000);
			// 画面手前が+Z
			camera.position.set(3, 8, 10);
			camera.lookAt(0, 0, 0);

			// 毎フレームのレンダリング処理
			function animate() {

				// requestAnimationFrameによる更新処理は他のブラウザタブが選択されると自動的にポーズされる
				requestAnimationFrame(animate);

				if (settings.rotation) {
					cube.rotation.x += 0.01;
					cube.rotation.y += 0.01;
				}

				renderer.render(scene, camera);
			}

			// WebGLのサポートチェック
			import { WEBGL } from 'https://unpkg.com/three@0.126.0/examples/jsm/WebGL.js';
			if (WEBGL.isWebGLAvailable()) {
				animate();
			} else {
				document.getElementById('container').appendChild(WEBGL.getWebGLErrorMessage());
			}
		</script>
	</body>
</html>
埋め込みを行うには、上記スクリプトを含んだHTMLファイル(scene.html)を iframe を使って呼び出します。
<iframe src="./scene.html" width="600" height="480"></iframe>
実際に埋め込んだ例は以下のようになります。
メニュー項目のトグルを操作してみてください。立体の回転やライトの切り替えを行うことができます。
以上 three.js を使用して3Dを表示するサンプルでした。
カメラを操作して視点を変更する方法については以下の記事を御覧ください。

