


Table of Contents
Swift で UITableView のセルの左側に画像を表示する方法と、それを応用したチェックリストのサンプルアプリです。
基本的な UITableView の作り方はこちらを御覧ください。
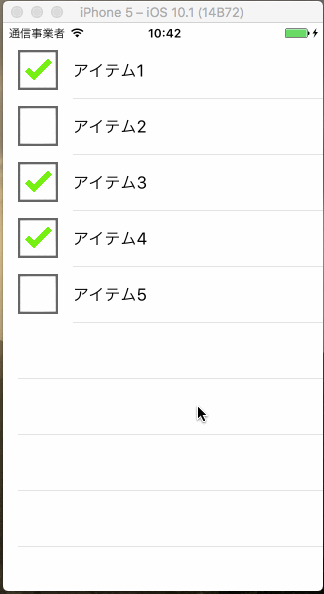
サンプルアプリ
以下のような、セルの左側にチェックマークを表示するチェックリストのサンプルです。
ソースコード
Xcode で新規プロジェクトを Single View Application のテンプレートで作成した時にできる ViewController.swift を以下のように書き換えます。
ViewController.swift
import UIKit

class ViewController : UIViewController, UITableViewDelegate, UITableViewDataSource {

    // ステータスバーの高さ
    let statusBarHeight = UIApplication.shared.statusBarFrame.height

    // チェックリストの項目とチェック状態
    var checkListItem: [String : Bool] = [
        "アイテム1" : true,
        "アイテム2" : false,
        "アイテム3" : true,
        "アイテム4" : true,
        "アイテム5" : false
    ]

    let tableView = UITableView()

    override func viewDidLoad() {
        super.viewDidLoad()

        // UITableView の作成
        tableView.frame = CGRect(
            x: 0,
            y: statusBarHeight,
            width: self.view.frame.width,
            height: self.view.frame.height - statusBarHeight
        )
        tableView.delegate = self
        tableView.dataSource = self
        self.view.addSubview(tableView)
    }

    // セルの作成
    func tableView(_ tableView: UITableView, cellForRowAt indexPath: IndexPath) -> UITableViewCell {

        // Dictonary のキーの配列を取得
        var keys = [String](checkListItem.keys)

        // キーで並び替え
        keys.sort()

        // キーの文字列を取得
        let cellText = keys[indexPath.row]

        // セルの作成とテキストの設定
        let cell = UITableViewCell(style: .default, reuseIdentifier: "cell")
        cell.textLabel?.text = cellText

        // チェック状態が true なら、初めからチェック状態にする
        if self.checkListItem[cellText]! {
            cell.imageView?.image = UIImage(named: "checked")
        } else {
            cell.imageView?.image = UIImage(named: "unchecked")
        }

        return cell
    }

    // セルがタップされた時の処理
    func tableView(_ tableView: UITableView, didSelectRowAt indexPath: IndexPath) {

        if let cell = tableView.cellForRow(at: indexPath) {

            // タップしたセルのテキストを取得
            let cellText = cell.textLabel?.text

            // 画像を切り替えと Dictonary の値を変更
            if cell.imageView?.image == UIImage(named: "checked") {

                self.checkListItem.updateValue(false, forKey: cellText!)
                cell.imageView?.image = UIImage(named: "unchecked")
            } else {

                self.checkListItem.updateValue(true, forKey: cellText!)
                cell.imageView?.image = UIImage(named: "checked")
            }

            // 選択状態を解除
            cell.isSelected = false
        }
    }

    func tableView(_ tableView: UITableView, heightForRowAt indexPath: IndexPath) -> CGFloat {
        return 56
    }

    func tableView(_ tableView: UITableView, numberOfRowsInSection section: Int) -> Int {
        return self.checkListItem.count
    }
}
ソースコードの解説
セルの左側に画像を表示する
セルは、クラス UITableViewCell で作成します。
このクラスのプロパティである imageView には、セルの左側に表示される画像を UIImageView で設定できます。
特に UIImageView として設定が必要ではなく、画像を表示できればよいという場合は、このプロパティの子プロパティである imageView.image に直接 UIImage を代入すればOKです。
今回のサンプルでは、画像を直接 UIImage で設定しています。
...
if self.checkListItem[cellText]! {
    cell.imageView?.image = UIImage(named: "checked")
} else {
    cell.imageView?.image = UIImage(named: "unchecked")
}
...
チェックリストの項目となる Dictonary の値を確認して、それによって初期チェック状態を変化させています。
クリックに反応してセルの画像を変更する
セルがタップされた時の処理は、以下のメソッド内(didSelectRowAt)で行います。
func tableView(UITableView, didSelectRowAt: IndexPath)
今回のサンプルでは以下のように、チェックされているセルをタップしたらチェック解除状態の画像に切り替え、チェックされていないセルをタップしたらチェックした画像に切り替えています。
同時に、Dictonary の値を変更しています。
    // セルがタップされた時の処理
    func tableView(_ tableView: UITableView, didSelectRowAt indexPath: IndexPath) {

        if let cell = tableView.cellForRow(at: indexPath) {

            // タップしたセルのテキストを取得
            let cellText = cell.textLabel?.text

            // 画像を切り替えと Dictonary の値を変更
            if cell.imageView?.image == UIImage(named: "checked") {

                self.checkListItem.updateValue(false, forKey: cellText!)
                cell.imageView?.image = UIImage(named: "unchecked")
            } else {

                self.checkListItem.updateValue(true, forKey: cellText!)
                cell.imageView?.image = UIImage(named: "checked")
            }

            // 選択状態を解除
            cell.isSelected = false
        }
    }
チェックリストの状態を保存している Dictonary を UserDefaults などに保存することで、アプリを終了してもチェックの状態を保持することができます。
以上が UITableView のセルに画像を表示する方法と、それを利用したチェックリストアプリの作成方法です。
ピンバック: [Swift3] UITableViewの基本的な使い方とリスト作成サンプル | JoyPlotドキュメント