


“Oculus Integration”に含まれる Assets > VR > Scenes のサンプルシーンからは様々な実装方法を学ぶことができます。
以下はサンプルシーン「Room」のスクリーンショットです。

不気味なブロックが散乱しています。Roomは、以下の設定が行われているシーンです。
OVRPlayerControllerを囲む6個のキューブで構成される立方体のルーム。Oculus Touchコントローラーを使用してキューブを選択するためのOVRGrabber.csやOVRGrabbable.csなどのスクリプトが含まれます。
Add Camera Rig Using OVRCameraRig | Oculus Developers
スティックによる視点変更やカメラの移動、中指のボタンでブロックを持ち上げたり吹き飛ばしたりといった物理挙動などが設定されています。
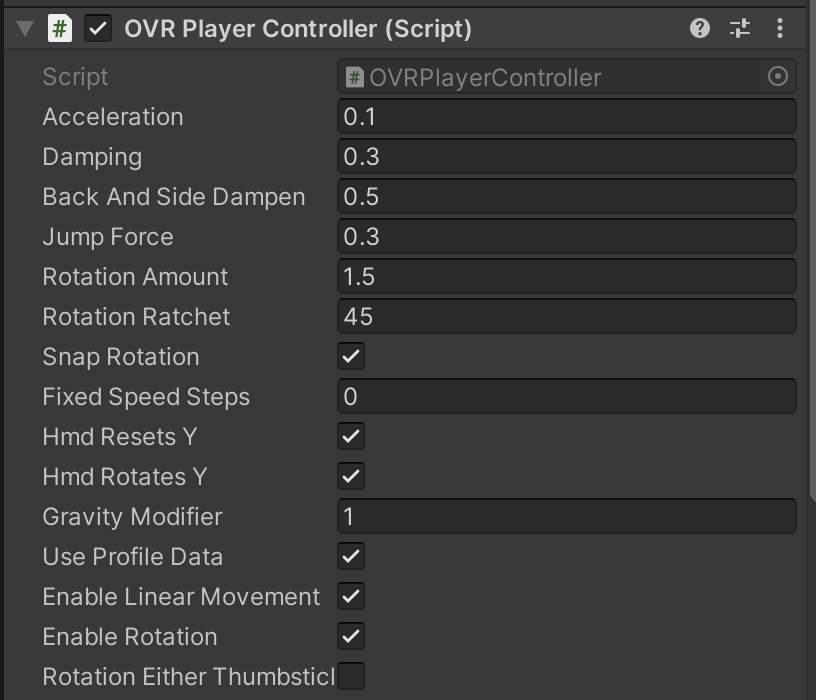
このシーンには、prefabの”OVRPlayerController”があり、それにはスクリプトのOVRPlayerController.csが紐付けられています。スクリプトの中を見てみると、移動や回転に関するプロパティが複数設定されており、このスクリプトがコントローラ入力に応じたプレイヤーの動作を決定していることがわかります。
コントローラによる基本入力をテスト
サンプルシーンを参考に、コントローラ(Oculus Touch)による入力でオブジェクトを動かすスクリプトを作ってみます。
Oculusで動作させるための初期設定を済ませたプロジェクトの新しいシーンに、Sphereオブジェクトを追加し、それに “Add Component” でスクリプト BallController を下記のように記述して追加します。
using System.Collections;
using System.Collections.Generic;
using UnityEngine;

public class BallController : MonoBehaviour
{
	public float speed = 0.5f;

	void Start()
	{

	}

	void Update()
	{
		// 人差し指の押し込みの強さを取得
		float primaryIndexTrigger = OVRInput.Get(OVRInput.Axis1D.PrimaryIndexTrigger);
		float secondaryIndexTrigger = OVRInput.Get(OVRInput.Axis1D.SecondaryIndexTrigger);
		// 中指の押し込みの強さを取得
		float primaryHandTrigger = OVRInput.Get(OVRInput.Axis1D.PrimaryHandTrigger);
		float secondaryHandTrigger = OVRInput.Get(OVRInput.Axis1D.SecondaryHandTrigger);
		// トリガーによる上下移動
		transform.Translate(0, primaryIndexTrigger, 0);
		transform.Translate(0, -secondaryIndexTrigger, 0);
		transform.Translate(0, primaryHandTrigger, 0);
		transform.Translate(0, -secondaryHandTrigger, 0);

		// スティックによる移動
		Vector2 primaryAxis = OVRInput.Get(OVRInput.Axis2D.PrimaryThumbstick);
		Vector2 secondaryAxis = OVRInput.Get(OVRInput.Axis2D.SecondaryThumbstick);
		transform.Translate(primaryAxis.x * speed, 0, primaryAxis.y * speed);
		transform.Translate(secondaryAxis.x * speed, secondaryAxis.y * speed, 0);

		// A
		bool isButtonAPressing = OVRInput.Get(OVRInput.Button.One);

		// B
		bool isButtonBPressing = OVRInput.Get(OVRInput.Button.Two);

		// X
		bool isButtonXPressing = OVRInput.Get(OVRInput.Button.Three);

		// Y
		bool isButtonYPressing = OVRInput.Get(OVRInput.Button.Four);

		// Aで下降
		if (isButtonAPressing) {
			transform.Translate(0, -speed, 0);
		}
		// Bで上昇
		if (isButtonBPressing) {
			transform.Translate(0, speed, 0);
		}

		// XまたはYで位置をリセット
		if (isButtonXPressing || isButtonYPressing) {
			transform.position = new Vector3(0, 0, 10.0f);
		}
	}
}
入力は OVRInput.Get によって取得できます。
以上の入力処理設定を終え、実機でテストしたスクリーンショットです。スティックやボタンでボール(Sphere)を操作することができます。通常、コントローラの左が「Primary」で右が「Secondary」となっているようです。

手元のコントローラをゲーム内で表示するには、”Oculus Integration”を追加したプロジェクトに含まれるprefabである LeftControllerPf および RightControllerPf を以下のように OVRCameraRig の子要素として加えます。
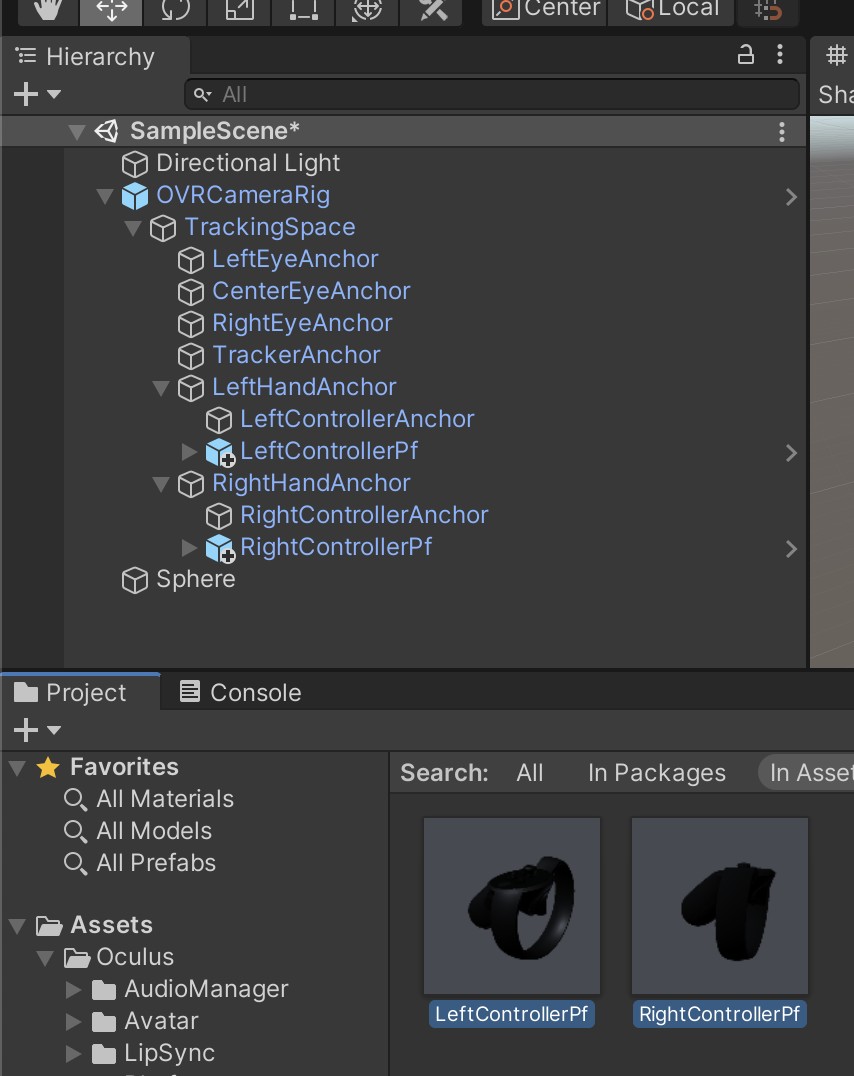
LeftHandAnchor に LeftControllerPf を、RightHandAnchor に RightControllerPf をそれぞれ子要素としてドラッグ&ドロップします。
参考: CustomControllers Sample Scene | Oculus Developers
しかし、この方法では表示されるコントローラが古いデバイスのものになっているのでprefabの編集が必要かも知れません。
Assets > Oculus > VR > Prefabs 内の OVRControllerPrefab.prefab を使用すると、最新のコントローラの形状が現れますが、スティックの動作などは反映されないようです。