Table of Contents
Androidアプリに表示する要素のデザインはXML形式のレイアウトファイルによって記述できます。
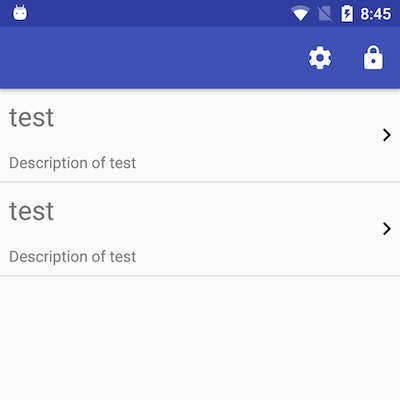
今回は、その中で RelativeLayout と呼ばれる配置方法を使って ListView で表示する以下のような右端に矢印の付いたリストアイテムを作成する方法を紹介します。
レイアウトXMLの記述例
上の画像のリストアイテムのレイアウトは以下のように記述されています。
<?xml version="1.0" encoding="utf-8"?>
<RelativeLayout xmlns:android="http://schemas.android.com/apk/res/android"
    android:layout_width="match_parent"
    android:layout_height="wrap_content"
    xmlns:app="http://schemas.android.com/apk/res-auto"
    android:descendantFocusability="blocksDescendants">

    <TextView
        android:id="@+id/item_title"
        android:layout_width="fill_parent"
        android:layout_height="wrap_content"
        android:layout_alignParentTop="true"
        android:layout_toLeftOf="@id/right_arrow"
        android:padding="8dp"
        android:textSize="24sp" />

    <TextView
        android:id="@+id/item_description"
        android:layout_width="fill_parent"
        android:layout_height="wrap_content"
        android:layout_below="@id/item_title"
        android:layout_toLeftOf="@id/right_arrow"
        android:padding="8dp" />

    <ImageView
        android:id="@+id/right_arrow"
        android:layout_width="wrap_content"
        android:layout_height="match_parent"
        android:layout_alignParentRight="true"
        android:layout_centerVertical="true"
        app:srcCompat="@drawable/ic_keyboard_arrow_right_black_24dp" />

</RelativeLayout>
配置に関わる記述をハイライトしています。
1つ目のTextViewの配置
左上の TextView には layout_alignParentTop と layout_toLeftOf を設定しています。
layout_alignParentTop は、その要素の上端を親要素の上端に合わせるという意味です。
これによって、この TextView は常に一番上に表示されます。
layout_toLeftOf は、その要素を指定した id を持つ要素の左側に配置するという意味です。
これによって、この TextView は後から追加する右端の矢印の左側に配置されます。
2つ目のTextViewの配置
左下の TextView には layout_below と layout_toLeftOf を設定しています。
layout_below は、その要素を指定した id を持つ要素の真下に配置するという意味です。
よって、2つ目の TextView は1つ目の真下に配置されます。
layout_toLeftOf は上記と同様です。
右矢印のImageViewの配置
右端に表示する右矢印は ImageView に Vector Drawable で用意した画像を表示しています。
この ImageView には layout_alignParentRight と layout_centerVertical を指定しています。
layout_alignParentRight は、その要素の右端を親要素の右端に合わせるという意味です。
layout_centerVertical は、その要素を親要素の垂直方向中央に配置するという意味です。これがないと矢印が上端にずれます。
以上で右端に矢印を表示するリストアイテムのデザインが完成します。
RelativeLayoutで使える配置パラメータの参考
RelativeLayout では、上記のような複数の配置指定を使ってレイアウトを組み立てていきます。
以下のページで RelativeLayout で使用できるパラメータの一覧が見られます。複雑なレイアウトを作成する際は参考にすると捗るかもしれません。

