

Table of Contents
Swift3.0でUIButtonクラスを使ってボタンを作ってアプリに配置する方法です。UIButtonを使うことで、テキストベースのボタンや画像をタップできるようにしたボタンを作ることができます。
テキストのボタン
最も基本的なボタンです。次の例は、最低限ボタンとして機能するのに必要な設定を行ったテキストボタンです。
ソースコード
import UIKit

class ViewController: UIViewController {

    override func viewDidLoad() {
        super.viewDidLoad()

        let button = UIButton()
        button.setTitle("ボタンのテキスト", for: .normal)
        button.setTitleColor(UIColor.blue, for: .normal)
        button.addTarget(self, action: #selector(buttonEvent(sender:)), for: .touchUpInside)
        button.sizeToFit()
        button.center = self.view.center
        self.view.addSubview(button)
    }

    func buttonEvent(sender: UIButton) {
        print("ボタンが押された")
        print("このメソッドを呼び出したボタンの情報: \(sender)")
    }
}
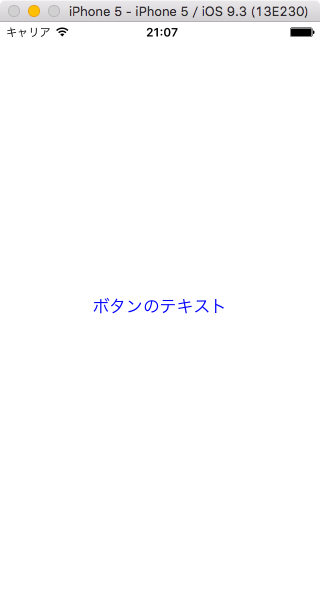
画面中央に青い文字で「ボタンのテキスト」と書かれたUIButtonができます。
次のコードは、上のコードの各処理にコメントで説明を加えたものです。
import UIKit

class ViewController: UIViewController {

    override func viewDidLoad() {
        super.viewDidLoad()


        // UIButtonのインスタンス
        let button = UIButton()

        // ボタンのテキスト設定
        button.setTitle("ボタンのテキスト", for: .normal)

        // ボタンのテキスト色を指定(これがないと白い文字になるため背景と同化して見えない)
        button.setTitleColor(UIColor.blue, for: .normal)

        // タップしたときに呼び出すメソッド指定
        button.addTarget(self, action: #selector(buttonEvent(sender:)), for: .touchUpInside)

        // 大きさの自動調節
        button.sizeToFit()

        // 位置を画面中央に
        button.center = self.view.center

        // ビューに追加
        self.view.addSubview(button)
    }

    // ボタンが押された時に呼ばれるメソッド
    func buttonEvent(sender: UIButton) {
        print("ボタンが押された")
        print("このメソッドを呼び出したボタンの情報: \(sender)")
    }
}
※ ボタンのインスタンス生成時に、タイプに .system を設定した場合は、ボタンのラベルのデフォルト色が青になります。
let button = UIButton(type: .system)
UIButton
ボタンを押したときの処理について
UIButtonを作る上で重要なメソッドが addTarget:action:for:です。このメソッドでボタンを押した時に呼び出されるメソッドを指定します。これを設定しないと押しても何も起こりません(ただのラベルと同じになります)
第二引数にボタンが押された時に呼ばれるメソッドを渡しますが、その形式は #selector(メソッド名(引数)) となります。
基本的には、押されたボタンの情報を呼ばれたメソッド内で受け取れるように、UIButtonを引数として持つメソッドを指定しますが、それ以外のメソッドも指定できます。
呼び出されるメソッドの引数は、実際の引数を設定するのではなく、引数のラベルを列挙します。
例えば、呼び出すメソッドが以下のように2つの引数を持っていた場合、
func buttonEvent(test1: String, test2: Int) {
   ...
}
以前は、第一引数のラベルだけはアンダースコア(_)で省略できたのですが、Swift3.0からは全て書く必要があります。
#selector(buttonEvent(test1:test2:))
一つも引数を持たないメソッドを対象とする場合は、以下のようにメソッド名だけで大丈夫です。
#selector(buttonEvent)
テキストとその色を指定する際の注意点
UIButtonのテキストや色は以下のプロパティから変えようとしても変更できません。
        button.titleLabel?.text = "ボタンのテキスト2" // これはダメ
        button.titleLabel?.textColor = UIColor.red // これもダメ
基本的にUIButtonのtitleLabelは読み取り専用で変更できません(フォントなど一部例外があります)
Although this property is read-only, its own properties are read/write. Use these properties primarily to configure the text of the button. For example:
UIButton *button                  = [UIButton buttonWithType: UIButtonTypeSystem];
button.titleLabel.font            = [UIFont systemFontOfSize: 12];
button.titleLabel.lineBreakMode   = NSLineBreakByTruncatingTail;
Do not use the label object to set the text color or the shadow color. Instead, use the setTitleColor:forState: and setTitleShadowColor:forState: methods of this class to make those changes.
setTitle(_:for:) – UIButton | Apple Developer
押したときにテキストや色を切り替える
メソッド setTitle や setTitleColor の第二引数では、どの状態のときにそのテキストや色を適用するかを指定します。
ここを .Highlighted にすると、ボタンを押した時のテキストや色を指定することができます。
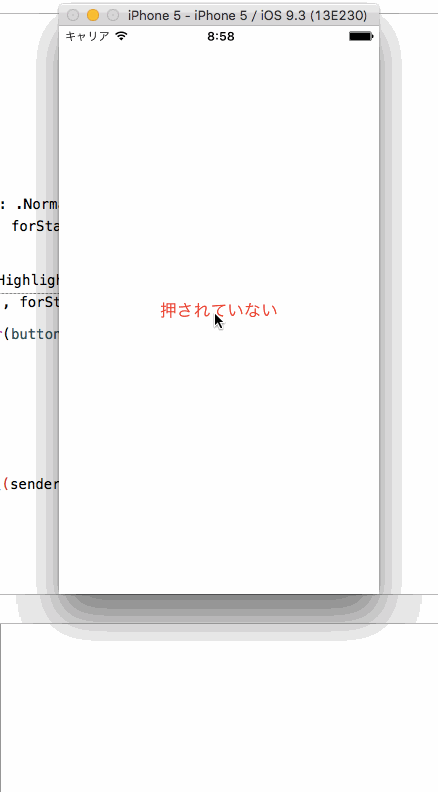
以下のコードは、ボタンが押された時のテキストを青文字の「押された!」に変更するサンプルです。
import UIKit

class ViewController: UIViewController {

    override func viewDidLoad() {
        super.viewDidLoad()

        let button = UIButton()

        // ボタンを押していないときの設定
        button.setTitle("押されていない", for: .normal)
        button.setTitleColor(UIColor.red, for: .normal)

        // ボタンを押したときの設定
        button.setTitle("押された!", for: .highlighted)
        button.setTitleColor(UIColor.blue, for: .highlighted)

        button.addTarget(self, action: #selector(buttonEvent(sender:)), for: .touchUpInside)
        button.sizeToFit()
        button.center = self.view.center
        self.view.addSubview(button)
    }

    func buttonEvent(sender: UIButton) {
        print("ボタンが押された")
        print("このメソッドを呼び出したボタンの情報: \(sender)")
    }
}
実行結果は以下のようになります。
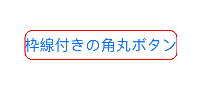
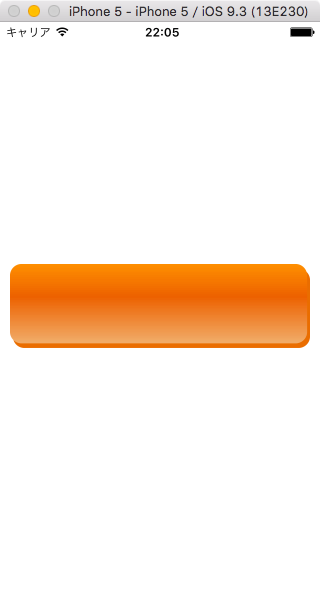
丸角の枠線を持つボタン
ボタンの枠線を表示して、その太さを変更するには以下のプロパティを設定します。
button.layer.borderWidth = 1.0
これは、ボタンが持つ CALayer の中のプロパティです。ボタンそのものに枠線を表すプロパティは無いようです。
枠線の色を設定するには、プロパティ layer.borderColor を設定します。この際注意が必要なのは、設定する色は UIColor ではなく CGColor である点です。
button.layer.borderColor = UIColor.black.cgColor
枠線を角丸にするには、同様に以下のプロパティを設定します。
button.layer.cornerRadius = 4.0
例えば、以下のコードによってこのような枠線付き角丸ボタンを作ることができます。
        ...

        let button = UIButton(type: .system)
        button.setTitle("枠線付きの角丸ボタン", for: .normal)
        button.sizeToFit()
        button.layer.borderWidth = 1.0
        button.layer.borderColor = UIColor.red.cgColor
        button.layer.cornerRadius = 8.0

        button.center = self.view.center
        self.view.addSubview(button)

        ...
画像のボタン
メソッド setImage を使います。
次のように、テキストの設定を除いて画像だけを設定すると、画像だけのボタンが作れます。
ソースコード
import UIKit

class ViewController: UIViewController {

    override func viewDidLoad() {
        super.viewDidLoad()

        let button = UIButton()
        button.setImage(UIImage(named: "buttonImage.png"), for: .normal)
        button.addTarget(self, action: #selector(buttonEvent(sender:)), for: .touchUpInside)
        button.sizeToFit()
        button.center = self.view.center
        self.view.addSubview(button)
    }

    func buttonEvent(sender: UIButton) {
        print("ボタンが押された")
        print("このメソッドを呼び出したボタンの情報: \(sender)")
    }
}
ピンバック: Mac VoiceOverでのXcodeの操作、ボタンやラベルの位置とサイズを設定する方法、キーボードショートカットでインスペクタを選択 – 点字とガジェットが好きな視覚障害者(全盲)のブログ